Learn how to pamper your back and spine with Raindrop Technique – Part 3
8.09.2023
After the deeply relaxing and calming first 2 steps of Raindrop Technique (the Valor Balance and VitaFlex Technique, both performed on the feet), you’ll be gently woken and invited to turn face-down onto the massage table.
This is where Raindrop Technique becomes incredibly unique and transformational!
Young Living oils are gently dripped up your spine, and “feathered in” using a technique inspired by the Native Americans…..and then massaged in with a series of very targeted massage techniques, designed to loosen the muscles along your spine, and release tension in every part of your back.
Sounds luscious, right? Well, in today’s bulletin I want to take a deep dive into this third step of Raindrop Technique, to inspire you around its history, the oils we use and why they are so beneficial to your back), and the massage steps.
All About Feathering
Feathering is a movement that Gary Young created, based on a fascinating story he heard when he was on a vision quest with a Native American elder. Many years ago, the Lakota people would travel to the north of America as part of their annual migration. There, they watched the aurora borealis (the lights of the northern sky) play across the sky.
If anyone in their tribe was in need of energetic balancing, they would put their palms up to the sky, and imagine themselves drawing this electrical energy out of the sky, and into their own body, sending it to the parts of their body that needed extra support.

Once the reservations were put in place, the Lakota people were no longer able to go on their annual migration, and so they needed to adapt this technique. The person receiving would put their palms up to the stars and the sky to draw in the amazing electrical energy from the aurora borealis, while another person would stand behind them and softly “feather” this energy up their spine.
This explanation gave Gary Young the idea of “feathering” oils up the spine. The backs of the nails are used to perform the feathering, and it’s performed with a touch that’s as light as a feather.
In fact, when I was present with Gary in Ecuador in 2007 and he was doing a Raindrop Technique teacher training, hardly any of us were able to perform this step lightly enough for Gary’s approval….so if you are thinking you are doing a very light feathering, see if you can go even lighter!

To me, this movement reminds me of the beautiful Hawaiian dancers, and their hands ever so lightly moving like the breeze as they dance. I bring this same energy into the feathering steps of every Raindrop Technique I perform, making my hands light and flowing as they caress the energy and the oils up the spine and over the back.
The result of this movement on the back is incredible!!!! When it’s performed this lightly, using the backs of the nails, the skin immediately jumps into goosebumps.
Gary always said this is such a good sign – the hairs stand on end when we have goosebumps, and the oil is “sucked” into the skin, creating a
spine-tingling sensation. Each stroke of feathering is designed to draw the oil up the spine, and out to the organs of the body.
Understand that this is all about energy. We are using the oils to energize and enliven the entire back, drawing the energy up the spine, then carrying the oils and their life force from here out to the sides of the body….washing all the organs hidden under the muscles of the back with this amazing energy!
Gary evolved feathering into a 5 step process…
The first 3 steps have the hands lightly brushing up the spine, stroking first with the left hand, then with the right hand, then with the left hand again, and so on, as the hands move up the spine.
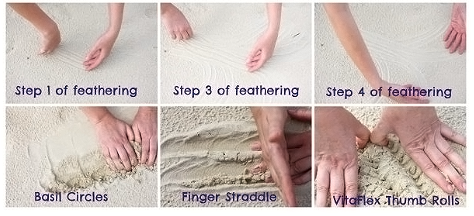
In Step 1, this is done with 6 inch/15cm strokes (as shown in this picture below on the left). Then the movement is repeated with 12 inch/30cm strokes, then it’s repeated again with strokes that run the full length of the spine.
Step 4 uses 6 inch/15cm strokes again, but this time the hands move in unison (as shown in the middle picture below). The hands draw the oil and the energy up the spine for 6 inches, then flair out over the sides of the body, as shown in the far right picture below. This movement is like tracing angel’s wings on the back.
The flaring movement is repeated all the way up the spine, three times in each location. Then the final step of feathering (Step 5) is to run both hands up either side of the spine together, then flare out over the shoulders.

I’m sure you are thinking “WOW!” at this stage….and it really is WOW when you receive it. It wakes up all the nerves along the spine and back due to the action of the feathering, so you feel invigorated and vibrantly alive.
How Raindrop Technique got its name
The name Raindrop Technique comes from the action of having Young Living’s therapeutic-grade essential oils dripped onto the spine and muscles like drops of rain (then feathered in). This is another one of the unique and delightful experiences of Raindrop Technique. It’s such an incredible sensation to have drops of essential oil splash onto your body like raindrops.
In his teacher training, Gary was incredibly precise about the height that we should hold that bottle of oil – NO MORE than 6 inches/15cm, so that it doesn’t go outside of the energy field of the body (the human aura) and be exposed to electrical interference.
But why drop from a height? What’s its purpose?
Well, it’s two-fold. Firstly, it mimics standing in the rain. The Native Americans loved doing this as an act of purifying the body….and it does feel incredibly purifying when the oil is being dripped onto your body.
Yet it also means the essential oil interacts with the auric field before it greets the skin….so on some level, our body is becoming attuned to the frequency of the oil even before it lands on us. According to Gary, this creates a heightened synergy between us and the oil, which in turn means that our body receives that oil so much better, with less likelihood of a skin reaction.

Feathering & dripping oils is just the beginning….
So you might be wondering whether Step 3 of Raindrop Technique (the back moves) are simply the process of dripping oils onto the spine, then feathering in? NOOOOO!!!!!
That’s just one part of it. After almost every oil has been applied and feathered in, massage steps are performed. These help to loosen the muscles, and bring all those wonderful benefits of massage to the physical body. And it also gives the body a chance to assimilate that essential oil and its vibration before the next oil is applied. This is a great way of “layering” oils onto the body, so the body benefits from each individual oil.
It’s like eating your first course, second course and dessert one after another, with a small break in between…that way you can savour each course to the max!
Performing Step 3 of Raindrop Technique…

Safety Precaution
Before I explain about Step 3, let me just cover over one very important safety point. Some of the oils that we use in Raindrop Technique are high in phenols, meaning they can feel hot or irritating to sensitive skin. Make sure you have some of Young Living’s V6 massage oil or other good quality vegetable oil on hand, to apply liberally to the back in case of a skin sensitivity. Fortunately, V6 is included in Young Living’s Raindrop Technique kit, along with all the essential oils you need for performing Raindrop Technique.
Because everyone’s body is different, I’m not going to indicate the number of drops we use of each oil. This bulletin gives you a great understanding of the steps of Raindrop Technique, however to learn the actual techniques and volumes of oil used, please make sure you attend a Raindrop Technique training. There’s more information on this at the top of this bulletin. So now, let’s look at the actual steps on the back…
Oregano and Thyme

Firstly, we apply (drip) Oregano oil up the spine, then feather it in. Then, we apply Thyme oil up the spine, and feather in.
These two oils are wonderful for fortifying the body, keeping it healthy and strong.
Next comes Basil oil. It’s feathered in, and then small circular massages are performed all the way from the lower back (ideally the top of the coccyx, where the buttock crease starts), all the way to the top of the neck. This is done first up the right side of the spine, then the left side of the spine, repeating like this 2 more times. This picture on the left shows the hand position for this movement.
This massage is targeting the erector spinae muscles that run up each side of the spine. These are often tight due to us spending too much time sitting or standing in front of computers and digital devices. Not only does the massage itself help to release these muscles, but so does the Basil oil, which is great for relaxing muscles that are in spasm, or holding a lot of tension.
Cypress and Finger Straddle

The next oil is Cypress – a wonderful oil for stimulating our back muscles. After it’s feathered in, the “Finger Straddle” is performed (see Gary demonstrating in this pic).
This involves one hand resting on the back with a finger on either side of the spine, while the other hand “saws” back and forwards over the lower hand.
This rhythmic sawing motion causes a luscious rocking motion of the spine – to me, it’s like being rocked in a cradle. I absolutely LOVE this particular move, as it helps the spine to maintain its natural flexibility.
Wintergreen and VitaFlex Thumb Rolls
Next comes Wintergreen oil. In the very early days of Raindrop Technique we used Birch oil instead of Wintergreen. However, Young Living has been unable to obtain Birch oil that meets their exacting standards, in enough quantity for our needs….so Wintergreen (which is a close cousin of Birch oil) has come to the rescue!

Wintergreen oil is very high in methyl salicylate, and I’m sure you’ll enjoy doing some research into the properties of this constituent. It’s actually quite similar in chemical structure to Salicylic Acid, which is found in Aspirin.
Gary did some studies into the frequency of essential oils, and found that Wintergreen oil has the same frequency as our bones!
So I love that it’s dripped directly onto the spine, to energetically invigorate this very important part of our body. Then it’s feathered in.
The next step is Vitaflex Technique performed with the thumbs, all the way from tailbone to top of the neck. Remember the Vitaflex movement? I discussed it in our last bulletin.
So the thumbs are doing this beautiful rolling motion from pads to nails to backs of nails, up each side of the spine. When you master this technique, it’s fast and fun! But it can take a bit of practice to get right.
Marjoram and Marjoram Circles

Next comes Marjoram oil, the “Herb of Happiness” and an essential oil that loves smooth muscle tissue. Because of this, it not only relaxes all the muscles along the back, but it also invigorates peristalsis.
Marjoram oil is dripped all over our back (not just the spine), then feathered in. And from here we do some beautiful strong massage circles up each side of the spine – like what’s shown in this picture on the left, except the hands and fingers are relaxed on the body and in full contact as the circular massage is performed.
Unlike the small circles (after Basil) that are specifically targeting the erector spinae muscles, these large circles are targeting the flat muscles that run all over our back. Like the Basil circles, the Marjoram circles are done up each side of the spine, from lower back to the top of the neck, starting with the right side of the body, then the left, then 2 more times on each side (alternating sides with each movement).
Aroma Siez and Indian Rub

Then comes Aroma Siez, a beautiful blend of oils that contains a lot of the other Raindrop Technique oils, and more! It also has deeply relaxing oils like Lavender in it. As with Marjoram, Aroma Siez is sprinkled over the entire back and feathered in.
Then the Indian Rub (more correctly termed “Lateral Effleurage”) is performed across the back, as shown in the picture on the right.
The giver stands at the side of the body and vigorously massages up the back, with the hands performing a back and forth motion across the back muscles and spine….like two trains passing each other.
The Indian Rub is another one of my favourite steps on the back to receive. It wakes everything up!
Peppermint and Valor

So it’s only natural that we’d then follow with Peppermint oil sprinkled up the spine and feathered in, and then Valor oil sprinkled over the entire back and feathered in.
Peppermint is highly energizing to the body and mind, and Valor oil balances the entire back and spine, thus it’s the perfect completion to Step 3 of Raindrop Technique, the back moves.
Some never before seen pics!
Ok, I now want to show you something really special. Many years ago, I was doing a photo shoot for Raindrop Technique, to advertise the technique and our courses. Our wonderful photographer, Greg Gardner and I went down to the beach, and I demonstrated the movements in the sand. This set of photos beautifully depicts the lightness of feathering, and then the areas where pressure is applied to the muscles of the back as we perform each massage step!

The many versions of Raindrop Technique
Gary Young created Raindrop Technique, and he never performed it the same way twice. Since first learning it back in the year 2000 with him, I’ve seen and learnt so many more variations. The principles always remain the same, however the order of the oils and the number (and placement) of oil drops have changed over time. Sometimes that was entirely deliberate, however at other times it was just Gary’s way – he’d go into his “zone” when performing Raindrop Technique, and a slightly new and different form would come out.
Is there one right way to perform it? No, of course not! All of the various adaptations have been amazing, and produced wonderful results for the body.
I teach this particular form that I’m describing in these bulletins, because it is how Gary asked me to teach it when I attended his teacher training in 2007 in Ecuador. But they all work, and they are all wonderful!
Next week, I’ll be explaining about the final step of Raindrop Technique, which is a lymphatic pump….and I’ll also share some of the wonderful experiences I’ve had when giving this technique to others.

How to Order

If you already have your own wholesale account with Young Living, you can order through the shopping cart on your virtual office, or via phone or live chat with your local Young Living office.
If it’s been more than 12 months since you’ve ordered, or if you’ve never set up an account, please reach out to the person who introduced you to Young Living.
You will need their member number when you place your first order.
If you have lost touch with them, or need any other assistance, we are here to help. Simply click on the button below, and we’ll be in touch to assist you and help answer your questions.
